Most griddle advice assumes you have four feet of steel and a patio to put it on. You don't need either. You need two heat zones and a surface you actually maintain.
I have cooked on a flat top for a living, and the thing that separates a good breakfast service from a bad one is not the size of the surface. It is whether the heat is split. One zone runs hot for the sear. One zone runs low to hold and finish. A double burner griddle gives you that split on a normal kitchen range, and a camp stove with a griddle top gives you the same split on a picnic table.
What follows is the setup I run, in order, from choosing the surface to putting it away dry. No gadgets, no 36 inch footprint, no guesswork.
Why you should trust me
Thirteen years on a line, eight of them working the flat top at a Phoenix diner that pushed 400 breakfasts before 10 a.m. These days I run a food trailer and a backyard griddle that gets fired three times a week, and I have cooked everything on a flat top from smash burgers to hibachi for a crowd of 30.
That background made me picky about three things: how evenly a surface holds heat, whether the grease path actually drains, and how a cooking surface behaves after a month of real use. Every recommendation below is filtered through those three questions.
How I picked these two
I judge every griddle the same way, whether it is a small pan or a four foot commercial unit.
Heat distribution comes first. Thick steel spreads heat and thin steel makes hot spots you spend the whole cook chasing with a spatula. That is the entire argument for clad construction.
The grease path comes second. A surface that pools fat in the middle is a surface you fight all morning, and a grease trap you cannot remove is a science experiment by Sunday.
The cooking surface comes third. A coated surface is easier to live with and has a lifespan. Bare steel asks for seasoning and rewards you for it. Neither one is wrong, but you have to know which one you bought.
Footprint comes last. You need enough surface for what you actually cook on a Tuesday, not for the brunch you host twice a year.
Those four questions narrowed a long list down to two pieces: one that travels, one that lives on the stove.
The gear you'll need before you start
You can run this whole method on a single surface, but the two pieces below cover the two places most people actually cook: outside on a stove, inside on a normal range.
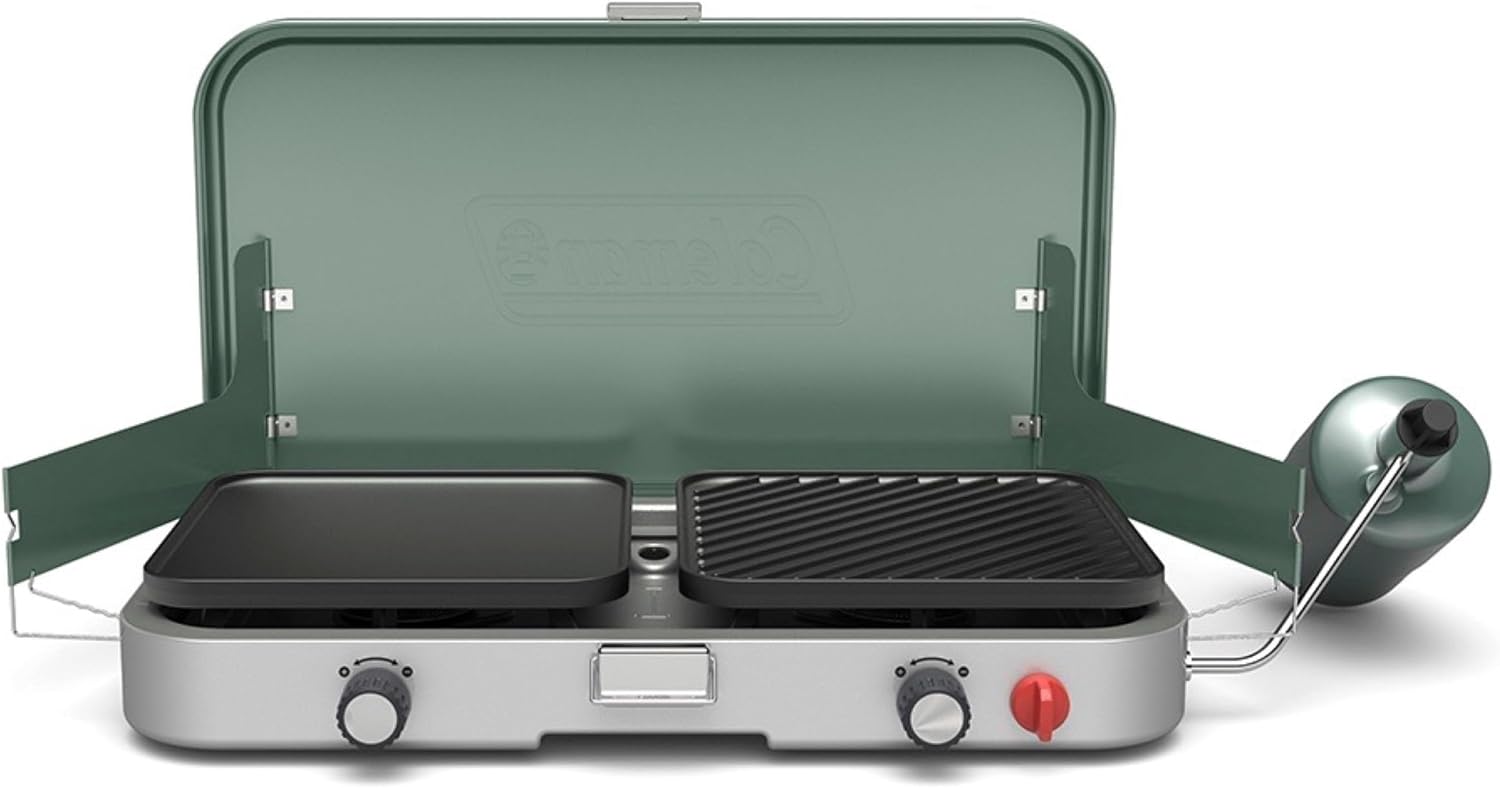
The camp pick: Coleman Cascade 3-in-1 Camp Stove, Portable Cooktop with Grill & Griddle
 Visit on Amazon →
The Cascade earns its place because the cooking surface swaps. Griddle, grill grate, or open burner, all on one body, off one fuel source. For this method that matters, because the griddle plate gives you a flat zone for eggs and hash browns while the burner side handles a pot of coffee or a kettle. One stand, one fuel canister, two jobs.
Two things to check before you buy any portable cooktop, this one included. First, whether the flat top lifts off for cleaning, because a griddle you cannot get fully clean is a griddle that tastes like last weekend. Second, whether the stove sits low and wide enough to stay stable on uneven ground. Camp griddles live and die on how they behave on a slope.
Flaws but not dealbreakers: Portable stoves are wind sensitive, so bring a screen or park the truck as a windbreak. The flat zone is small, which means you cook in batches instead of all at once. That is the tradeoff for something that fits in a tote.
Anyone cooking for two to four people at a campsite, a tailgate, or a job site will get their money out of this.
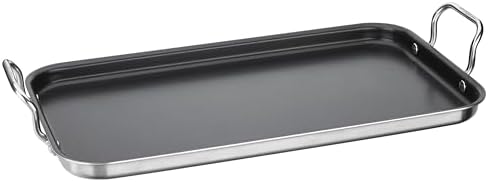
The kitchen pick: Cuisinart MultiClad Pro Triple Ply Stainless 10" x 18" Non-Stick Double Burner Griddle
 Visit on Amazon →
This is the piece that lives on the range. It spans two burners, so on an ordinary residential stove you get a genuinely hot side and a genuinely cooler side, which is the whole trick behind a two-zone setup. The triple ply stainless construction across the base is what keeps the heat from two burners meeting in the middle instead of leaving a dead strip down the center, and the non-stick surface means eggs and pancakes release without a quarter stick of butter per batch.
The 10 by 18 inch footprint is the other reason it works. It is wide enough to run a hot zone and a hold zone side by side, and still narrow enough to sit on a normal range without hanging over the front burners.
Flaws but not dealbreakers: This is a coated surface, so treat it like one. No metal spatula, no empty preheat on high, no dishwasher if you want the coating to last. A coated griddle has a lifespan and a bare steel one has a maintenance schedule. Pick your tradeoff and commit to it.
Anyone in an apartment or a house with a standard four burner range will get more out of this than out of a countertop electric griddle that eats cabinet space.
The actual setup workflow
Here is the sequence. It works the same on a camp stove and on a kitchen range.
Step one: Assign your two zones before you turn anything on. Right side hot, left side medium low. The hot side is for searing, potatoes, and anything you want browned. The low side is for eggs, pancakes, and holding. On the double burner griddle, each burner is a zone. On the camp stove, the flat plate is your griddle zone and the open burner is your pot zone.
Step two: Level the surface. A camp stove on a slope pools grease on one side and burns on the other. Shim it or move it. Indoors, set the griddle across both grates and check that it does not rock. A rocking griddle gives you a hot spot and a cold spot you did not ask for.
Step three: Preheat low and slow. Give it ten minutes on medium, then adjust from there. Bare steel can take more heat. A coated surface should never sit empty on high, because that is how coatings fail early.
Step four: Oil thin, then wipe it back off. A teaspoon of high smoke point oil, spread with a paper towel, then wiped until the surface looks almost dry. If you can see a puddle, you used too much, and the next thing you cook will fry instead of sear.
Step five: Load in the right order. Potatoes and hash browns first, because they take the longest and want the hot zone. Protein next. Eggs last, on the cooler zone, where they can sit without turning brown.
Step six: Manage grease as you go, not at the end. Push fat toward the drain or the low corner with the scraper and wipe the surface between batches. Fat that stays on the surface burns and flavors everything that comes after it.
Step seven: Clean it while it is hot. On steel, scrape with a splash of water and finish with a thin oil coat. On a coated surface, warm water and a soft sponge only. No abrasives, no steel wool, ever.
Step eight: Dry it completely before it goes away. Every rust complaint I have ever heard traces back to storage, not to the griddle. Dry it, wipe a thin film of oil across the surface, and put it somewhere that is not damp.
Where this setup falls short
Be honest with yourself about the limits before you buy.
A coated surface wears out. Once it flakes, it is done, and no amount of careful cooking brings it back. If you want a surface that can be scraped, reseasoned, and handed down, you want bare steel instead.
Two zones is not four. You will cook in batches, and you will hold finished food on the low side or in a warm oven. If you routinely feed 20 people breakfast, this is not the setup for that.
Portable stoves lose heat in wind and at altitude, and they do not have the recovery time of a full size outdoor flat top. Plan your batches around that instead of fighting it.
And nothing here is rust proof. Everything rusts if you neglect it. The maintenance is the price of admission.
What this all costs
The camp unit costs more than the pan, because you are buying a stove and a cooking surface in one package. The double burner griddle costs less than a full size outdoor flat top by a wide margin, and it stores in a cabinet instead of taking over a patio.
Run the math on your own cooking. If you make breakfast at home three mornings a week instead of buying it, the griddle pays for itself inside a season, and the camp stove pays for itself the first weekend you are not driving into town for food. Both are cheaper than buying twice, which is exactly what happens when you start with the cheapest warped surface you can find.
That is the job. Two zones, thin oil, clean it hot, dry it before you store it. Do that and the surface outlasts the trend.