Most people buy a griddle, cook bacon on it twice, and then stand there in week three wondering why the eggs weld themselves to the steel. Flat top griddle seasoning is the answer to about 80 percent of the questions I get, and it is also the thing almost nobody explains in a way you can actually use. Everyone says "season it." Nobody tells you what a thin coat looks like, how hot the surface should be, or how long to wait between coats.
I spent 13 years as a line cook, eight of those on the flat top at a diner that pushed 400 breakfasts a morning. Now I run a food trailer and a backyard griddle that gets used three times a week minimum. I have seasoned more surfaces than I can count, and I have watched plenty of them go orange and gritty after a month of neglect.
The fix is not a new griddle. The fix is a routine you can repeat in five minutes after every cook, plus a first-seasoning session done right.
Why you should trust me
I test griddles the way a short-order cook does, not the way a showroom does. Every surface that comes through my yard gets 100 smash burgers, a full breakfast service with eggs, hash browns, and pancakes, and then a 60-day seasoning test where I stop babying it and see how long the polymer holds before rust shows up.
I keep a scraper and a squeeze bottle in my truck at all times. I do not make temperature claims without a surface thermometer sitting on the steel. And I do not tell anybody a griddle will never rust, because that is a lie. Everything rusts if you neglect it.
How I picked and how I tested
There are two ways into flat top cooking, and they are not the same purchase. One is a cast iron topper you set over a burner or on grill grates. The other is a free-standing station with its own burners and legs. I tested both categories with the same routine: season, cook 100 burgers, run a breakfast service, then check the seasoning every week for 60 days.
The numbers I trust are simple. A surface thermometer reading tells me whether heat is even across the steel or whether I have one hot stripe and two cold corners. A 60-day seasoning check tells me whether the polymer is holding or flaking. And the grease trap check, which is me emptying it after a pound of bacon, tells me whether I will actually keep using the thing on a Tuesday night.
Thin steel with a good burner layout beats thick steel with a bad one. BTU count is a lie without burner layout, so I look at zones before I look at numbers.
The two surfaces worth setting up
You cannot season a griddle you cannot heat evenly, so start with the right surface for the space you have. Here are the two I would buy again.
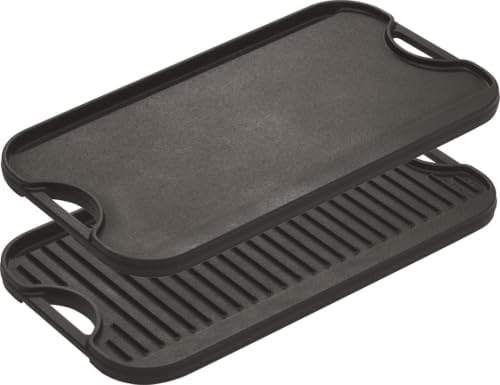
Budget pick: Lodge Pro-Grid Reversible Grill/Griddle, PFAS-Free, 20 x 10.5 Inches
 Visit on Amazon →
This is bare cast iron, and bare cast iron is the best teacher a new griddle cook can have. It is PFAS-free because there is no coating to worry about, just iron and the oil you polymerize onto it. It is reversible, so the flat side is your griddle and the ribbed side is your grill, and it sits over a burner on the stove or across grill grates out back. Check current Amazon price.
The seasoning behaves the way cast iron always behaves: slow to build, hard to kill once it is built. Two people, a small patio, an apartment with a gas range, or a camper setup is the sweet spot. A full breakfast for six is not, because you run out of square footage before you run out of appetite.
Flaws but not dealbreakers: It is heavy, and it stays hot a long time after the burner is off, so plan where you set it down. The cooking area is small by design, which means you cook in batches and hold what you finish. The handle end gets hot, so keep a towel or a glove on the counter next to it.
Anyone cooking for one or two, or anyone who wants to learn seasoning on a surface that forgives mistakes, should start here.
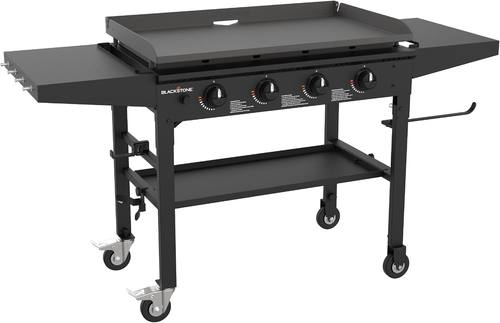
Our pick: Blackstone 36 Inch 4 Burner 60,000 BTU Portable Steel Griddle Cooking Station with Foldable Legs, Grease Pan, and Storage Rack, Black
 Visit on Amazon →
This is the benchmark for a reason, and it is not the total BTU figure. Four burners across a wide surface means four zones, and four zones means you can run hash browns on the left, eggs in the middle, and burgers on the right without any of them fighting each other. That is the whole game. Foldable legs and a storage rack make it a station you can move, and the grease pan gives the fat somewhere to go besides the corners of the steel. Check current Amazon price.
I run this class of griddle for feeding people, and the difference between two burners and four shows up on the second plate, not the first. The 60,000 BTU rating gets all the attention, but the burner layout is what you are paying for.
Flaws but not dealbreakers: It takes up real space, so measure the patio before you commit and find a level spot, because a griddle that rocks is a griddle that pools oil on one side. The grease pan needs attention every cook, not every weekend. And a surface this wide will show you exactly where your seasoning is thin, which is a feature if you are paying attention and an annoyance if you are not.
Anyone feeding four or more, or anyone who wants to cook a whole breakfast service without holding food in the oven, should look here first.
The seasoning routine, step by step
This works on carbon steel and on cast iron. The only difference is that cast iron takes longer to heat and longer to cool.
Step one: Wash it first. New steel ships with a protective coating that seasoning cannot bond through, so scrub it off with hot soapy water, rinse, and dry it completely. This is the one time soap touches the surface.
Step two: Heat it low and even. Bring the surface up slowly for 10 to 15 minutes. Low and slow gets the whole plate hot at once. Cranking one burner to max gives you a hot stripe and cold corners, and seasoning laid on a cold corner will not polymerize there.
Step three: The thin coat. Pour a teaspoon of a high smoke point oil onto the surface and spread it with a folded paper towel held in tongs. Then wipe it again, like you are trying to remove what you just put down. What is left is the correct amount. If it looks wet and glossy, you used too much, and too much oil turns into sticky brown gum, not seasoning.
Step four: Let it smoke, then let it stop. Wait for the oil to smoke, and wait for the smoking to stop. That is the oil polymerizing into a hard layer. If you add the next coat while it is still smoking, you get a streaky surface.
Step five: Repeat four to six times. Thin coats, heat, patience. Each pass builds on the last. The surface turns amber, then brown, then dark. That is the color you want before food ever touches it.
Step six: Break it in with fat. The first cook should be something greasy. Bacon, burgers, onions, sausage. Do not start with eggs or fish. A fatty first cook fills the pores and teaches you how the surface holds heat.
Step seven: One coat after every cook. Scrape it hot, wipe it clean, lay down one thin coat and leave it. That is the whole maintenance routine and it takes five minutes.
The first cook: 100 smash burgers
Get the surface hot, then drop a thin layer of oil, then lay down your beef. Smash it flat once, hard, with a stiff spatula. Do it once and do not mess with it. Thirty seconds, scrape under it, flip it, cheese on, and off. That is a smash burger.
This is the cook that tells you whether your heat is even. If the patties on the left side of the plate brown faster than the right, your burner zones are not doing what you paid for. On the four burner station, that is your cue to use the zones deliberately instead of treating the whole surface as one pan. On the cast iron topper, it is your cue to keep the food in the middle and give the edges time.
Cook 100 of them and you will know your griddle better than any spec sheet can tell you.
Grease management, the part nobody plans for
The grease trap decides whether you cook or fight. A griddle that drains properly is a griddle you will use on a weeknight. A griddle that pools fat in the corners is a science experiment by Thursday.
On the station, empty the grease pan while it is still warm, because cold fat turns into a brick you have to chisel. Emptying it after every cook is not optional, it is the cost of a wide cooking surface.
On the cast iron topper you have no trap at all, so you pour off into a metal can, tilting carefully, and you do it while the pan is still warm enough to move the fat and cool enough not to splash you. Plan that step before you start cooking, not after, and keep a can on the counter.
Cleaning, rust, and the 60-day test
Clean it hot. Water on a hot surface lifts the food residue and turns it into steam, and the scraper pushes it off. For stubborn spots, a splash of water and a scrape, then a wipe. No soaking a cast iron pan, no dishwasher, ever.
Then dry it and oil it. A griddle that rusts is a griddle that was neglected, not a griddle that is bad. Rust means moisture sat on bare iron. Scrub the rust off with steel wool, wash, dry, and go through the seasoning steps again. The surface comes back.
The 60-day test is my honesty check on any surface. Season it, cook on it hard, then slack off for a week. If a week of neglect puts orange spots on the steel, you know the polymer layer is thin and you need to oil more consistently. In a dry climate, you get more slack. Near the coast, you get almost none.
What this all costs
The cast iron topper is the cheap entry point, and the station is the bigger commitment. But the griddle itself is not the whole bill. Add a metal scraper, two squeeze bottles for oil and water, a surface thermometer, a cover if it lives outside, and propane if you are running a free-standing station.
Spread the station over a year of Tuesday-night cooks plus weekend breakfasts, and the cost per cook stops looking like a purchase and starts looking like a habit. Check current Amazon price on both units before you decide, because the gap between them is the price of a whole accessory drawer.
The math is the easy part. The five minutes after every cook is what separates a griddle that gets used for a decade from a griddle that gets abandoned in month two.
The bottom line
Season it thin, heat it slow, cook on it often, oil it every time. That is the job. A flat top is the most versatile cooking surface in existence, and it does not care whether you spent a little or a lot. It cares whether you scrape it hot and put one honest coat of oil on it before you walk away.
Do that, and the eggs stop sticking. That is the whole promise.