A countertop flat top griddle is the cheapest way to find out whether you actually like cooking on steel. It plugs into a wall, it sits on a counter or a folding table, and it does the one thing a skillet can never do: give you a wide, flat, uninterrupted surface where four burgers, a pile of onions, and two eggs all cook at the same time.
The catch is that a countertop flat top griddle arrives unfinished. Bare steel, a thin coat of shipping oil, and nothing else. Cook on it like that and everything sticks, the surface stains, and you spend the next year blaming the griddle instead of the setup.
I have spent 13 years on flat tops, eight of them on a four-foot commercial unit at a diner that served 400 breakfasts a morning. Here is the order I would do it in: set the unit up square, season it in thin layers, cook something fatty, then build the habit that keeps the surface black instead of orange.
Why you should trust me
I cooked on a flat top for eight of my 13 years as a line cook. The diner ran 400 breakfasts a morning, which means I have scraped, oiled, and re-seasoned a cooking surface more times than I can count. These days I run a food trailer and a backyard griddle that gets used three times a week minimum, everything from smash burgers for a crowd to hibachi for 30 people.
That background is why I care about exactly three things when I look at a griddle: how evenly heat spreads across the steel, whether the grease management actually works, and whether the surface still holds a season after 60 days of real use. BTU numbers on a box tell you nothing without burner layout. A griddle that rusts is a griddle that was neglected, not a griddle that was bad. Nobody ever ruined a flat top by scraping it too much.
How I picked the gear in this guide
This is a how-to, not a shootout, so the gear list is short: one cooking surface and one set of tools.
Two things decide whether the setup works. The first is size. You do not need 36 inches. You need enough surface for what you actually cook on a Tuesday night, and a 22-inch unit feeds two people comfortably and four if you cook in rounds. The second is tools. The scraper is the most important accessory you will buy, because cleaning the surface while it is hot is what builds seasoning instead of stripping it. A wide spatula is second, because smash burgers need one firm, flat press.
I skipped anything with a nonstick coating. Coated surfaces lose that coating in a season, and once it goes, the steel underneath is bare and scratched.
The gear you need before the first cook
Two purchases cover the whole setup. Get both before the griddle arrives, so you are not scraping a hot surface with a dinner fork on day one.
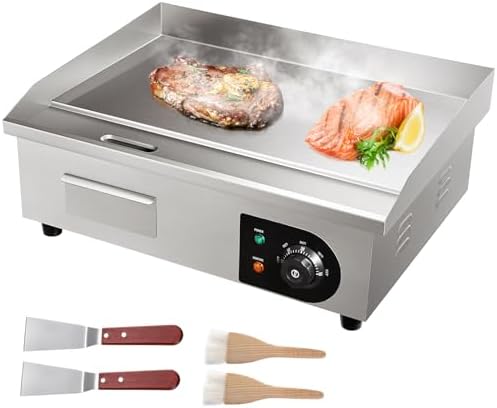
The griddle: VEVOR Commercial Electric Griddle, 22", Countertop Flat Top Griddle
 Visit on Amazon →
This is the countertop route: a 22-inch electric flat top that runs off a wall outlet. Electric means no propane tank, no regulator, and no burner that refuses to light on a cold morning. It also means you can run it on a patio, a garage bench, or a covered porch, which is where most people actually end up cooking.
Twenty-two inches is the size I recommend to anyone who has never owned a flat top. It is wide enough for four smash burgers and a pile of onions, or a full breakfast for two with the eggs and the potatoes sharing the same surface. It is small enough to store on a shelf and carry to a tailgate.
Before you order, check three things: the outlet you plan to use, the counter space the unit needs once you add a landing zone for the spatula and the oil, and how the drip tray comes out. Electric countertop griddles live and die by grease management, and a tray that is awkward to pull means you will skip emptying it, and skipped grease is how a cook turns into a cleanup. Check current Amazon price before you commit, and measure your counter first.
The tradeoff of this class of griddle is capacity and counter real estate, not cooking quality. You are trading surface area for portability and a plug. If you regularly feed more than six people, this is the wrong size and you already know it.
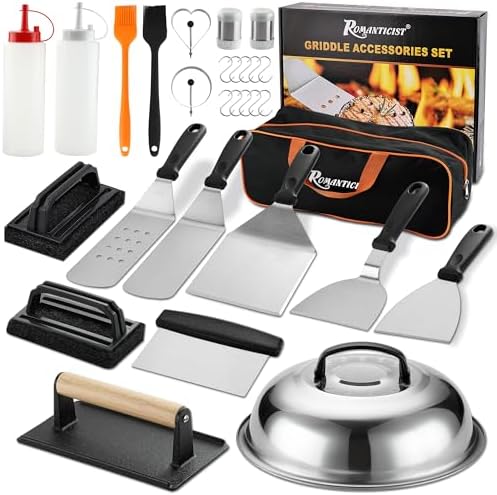
The tool kit: ROMANTICIST 29PCS Griddle Accessories Set - Flat Top Teppanyaki Spatula Set with Scraper, Basting Cover for Camp Chef- Home Cooking Griddle and Outdoor BBQ Gifts for Christmas
 Visit on Amazon →
This is the kit I would hand someone setting up their first flat top. It is a 29-piece set built around the tools that matter: a flat top spatula, a scraper, and a basting cover, plus the smaller pieces that fill a drawer.
The scraper earns its place on day one. Cleaning a griddle while it is still hot, with a metal edge and a splash of water, is how you keep the surface level and seasoned. The basting cover is the other piece you will reach for constantly, because dropping it over a burger with a slice of cheese melts it in under a minute and steams onions without dirtying a separate pan. The wide spatula is what you press with.
The listing notes the cover is intended for Camp Chef and home cooking griddles, so measure the depth of your surface before you assume the fit. A cover that overhangs the edge of a 22-inch unit is annoying, not fatal, but you should know it going in.
What you will not use is most of the small pieces. That is fine. Kits cost less per tool than buying one at a time, and the extras eventually find a job. Check current Amazon price and compare it against buying a scraper and a wide spatula separately, because if you already own a good spatula, the kit math changes.
The setup and seasoning workflow
This works on any bare steel flat top, gas or electric. The order matters more than the products.
Step one: strip the shipping oil. Warm water, dish soap, and a nylon scrub pad. No steel wool, no abrasives. The factory coats the steel so it does not rust in the box, and that coat is not seasoning. Wash it off, dry the surface completely with a towel, then heat the unit to drive off any moisture hiding in the corners.
Step two: level the unit and seat the drip tray. A griddle that tilts away from the trap pools fat on the cooking surface, and pooled fat burns into a sticky ring you will fight for months. Set the tray in place before the first cook, not after.
Step three: run the first heat cycle empty. Let the surface come up to temperature with nothing on it. Watch where it darkens first. That tells you where your hot zone is, and every griddle has one. On a two-burner unit you will learn that the middle runs hotter than the edges, and you will cook accordingly from then on.
Step four: apply a thin coat of oil. Flaxseed, canola, or grapeseed all work. Put a small amount on a folded paper towel, wipe it across the warm surface, then wipe it again with a clean part of the towel until the steel looks dry. It should look almost un-oiled. Thick oil is the single most common seasoning mistake, because it turns gummy and flakes off in sheets.
Step five: let it smoke, then repeat. Bring the surface back up and wait for the smoke to stop before the next coat. Three to five coats in the first session gets you a bronze surface. It will not be black yet. Black comes from cooking, not from an afternoon of wiping.
Step six: cook fatty food first. Bacon, smash burgers, sausage, onions. Fat is what finishes a season. This is not a superstition, it is the chemistry of polymerized oil building up in layers. Save the lean fish and the vegetables for week two.
Step seven: clean while it is hot. Scrape the surface with the scraper while it is still warm, push the debris into the trap, wipe with a towel, then apply one thin coat of oil. Water is fine for loosening stuck spots. Soaking is not. Never leave water sitting on the steel.
Step eight: make it a habit. After every cook: scrape, wipe, oil, cover. Steel rusts because of humidity and neglect, not because the griddle is cheap. A cover is the difference between a surface that looks new in year three and one that looks like a shipwreck.
The first cook: smash burgers on a fresh season
This is the cook that tells you whether your setup is right.
Get the surface hot, hot enough that a flick of water beads and skates rather than sitting there. Lay down a thin film of oil and spread it with the wide spatula. Roll your beef into loose balls, about two ounces each, and set them on the surface with space between them.
Wait 30 seconds. Then press. One firm, flat push with the wide spatula, straight down, and hold it for a second. Do not press twice, and do not press later in the cook, because you are pressing out juice, not flavor. Season the top, wait until the edges go brown and lacy, then scrape under it and flip. Cheese on, basting cover over the top, and give it a minute.
Do four at a time on a 22-inch surface, not eight. Crowding the griddle drops the surface temperature and you end up steaming the meat instead of searing it. Two rounds of four beats one round of eight every time.
When you are done, scrape the surface while it is still hot. That first cook leaves a dark, glossy patch in the middle of your griddle, and that patch is the beginning of a real season.
Where this goes wrong
Most griddle problems are setup problems, and they show up in the first month.
Warped steel out of the box. If the surface rocks on a flat counter or the corners lift when it heats, send it back. A warped griddle is a lifetime of uneven burgers, and no amount of seasoning fixes geometry.
A grease trap that does not drain. Fat should flow into the trap, not pool at the edge. If you are pushing grease around with a scraper instead of watching it run, the tray design is fighting you.
Too much oil. Gummy, flaking, sticky seasoning is almost always over-oiling. Thin coats, wiped dry, always.
Acidic food too early. Tomatoes, vinegar, and citrus pull at a young season. Give the surface a couple of weeks of fatty cooks before you deglaze with wine.
Leaving it uncovered. A griddle left out in humidity will rust, no exceptions, no matter what the box claims. Cover it and oil it, or accept the maintenance.
Buying a coated surface. Nonstick griddles lose the coating in a season. Once it goes, you are cooking on scratched steel anyway, with none of the seasoning benefits.
What this guide does not cover
Full-size propane flat tops with a cart and a side shelf are a different article, and so are the big built-in units for an outdoor kitchen. They solve a capacity problem this setup does not have, and they cost several times more once you add the tank, the stand, and the cover.
Indoor electric griddles with nonstick coatings are also a separate conversation. They work in an apartment, but they are not the same tool, and the seasoning advice above does not apply to them.
This guide is about the countertop steel route: one surface, one set of tools, one habit.
What this all costs
The honest cost breakdown has three buckets. The surface is the big one. The tool kit is a one-time purchase that outlives the griddle. The consumables are oil, paper towels, and whatever you cook, and that bucket is the same whether you own a griddle or not.
The math that matters is not the sticker. It is cost per cook. A countertop unit that gets used three times a week pays for itself against takeout in a couple of months, and a flat top that sits in the garage because you never learned to season it costs you every time you look at it. Check current Amazon price on both the griddle and the tool kit, then do the boring part: wash the steel, level the unit, and wipe on thin coats until the surface turns bronze.
That is the whole job. Seasoning is a habit, not an event. Do it right for two weeks and you will have a surface that releases eggs and cleans in 30 seconds for the next decade.